Make Analytics Great Again
#nextjs
#terraform
#aws
Published on Jun 29, 2021
·6 min read
Dear readers, if you are reading this article, it means you're looking for a way to measure the number of views of your website. You could easily use Google Analytics, even though it's free, but it's really hard to fully understand and use it. I decided to go with an alternative and I will try to explain why I chose Plausible Analytics.
What is Plausible?Link to this heading
Plausible Analytics was created and is still maintained by Uku Taht and Marko Saric from Estonia. It is a fairly new web analytics service since it started in December 2018 and launched in April 2019. They say that it is a simple and privacy-friendly alternative to Google Analytics.
Its strengthsLink to this heading
One of the main features I like about Plausible is that it is fully open source. You can see exactly what the code looks like and even contribute to it if you want in their GitHub repository.
It is so easy to integrate and since the script is only 1 KB, it's lightning-fast!
They do not use cookies whatsoever, compared to Google Analytics, which makes them GDPR and PECR compliant. Say goodbye to the cookie banner.
They're not tracking people across devices nor across websites and apps which means they can't know or understand the behavior of your users.
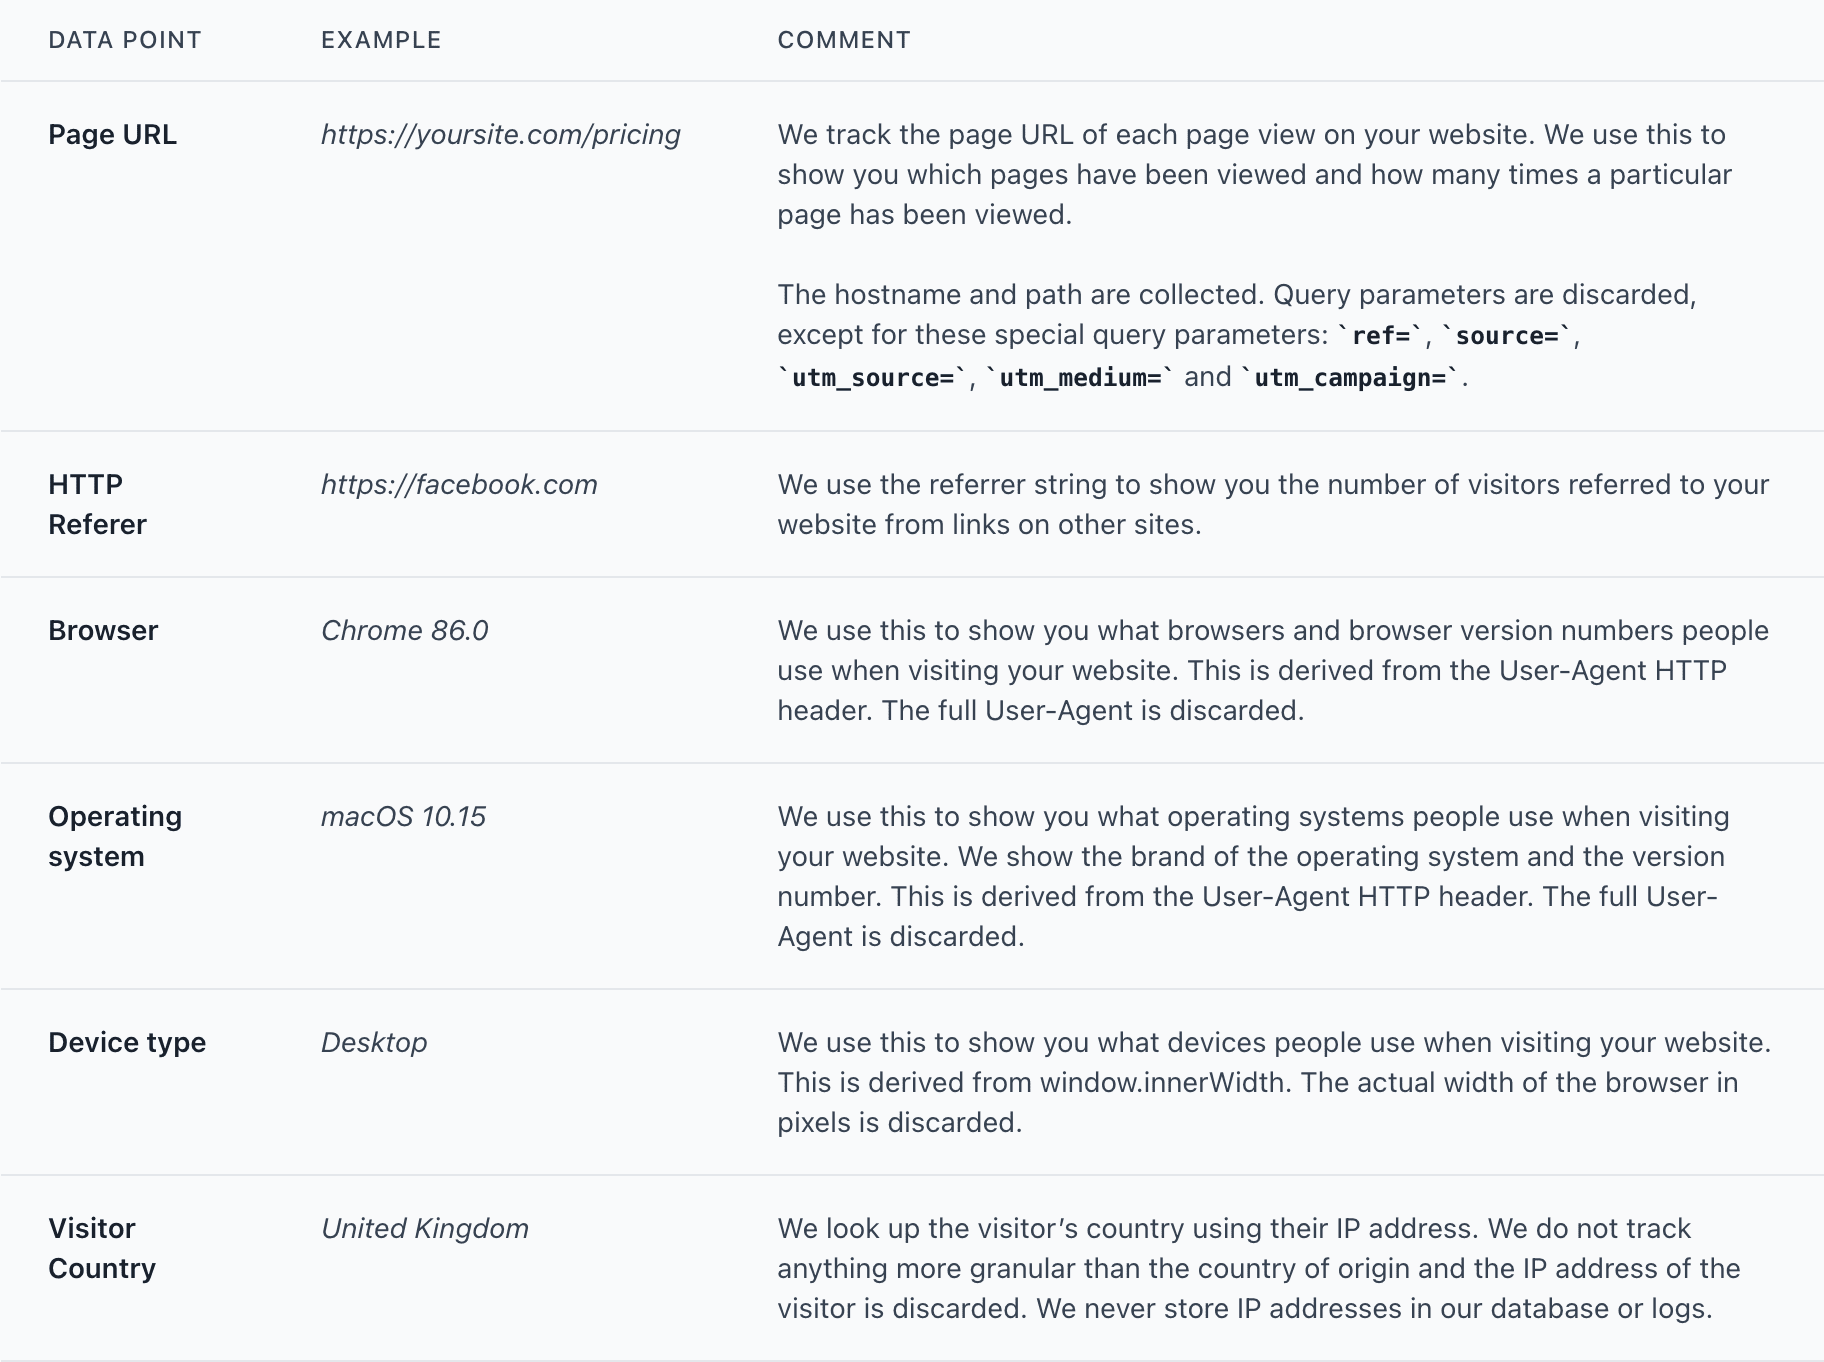
All collected data can be found below. As you can see there are no personal data or personally identifiable information collected. At the end of the day, Plausible only tracks the overall trends in my website traffic.
Last but not least, I can self-host it wherever I want and make it public so that everyone can see what I have access to.
Self-host Plausible like meLink to this heading
For this little project, we will use their up and running template that has everything we need to boot up our Plausible server.
We're gonna use Terraform as our IaC (Infrastructure as Code) tool and we will deploy our infrastructure to AWS.
What we're gonna build can be summarized with this diagram:
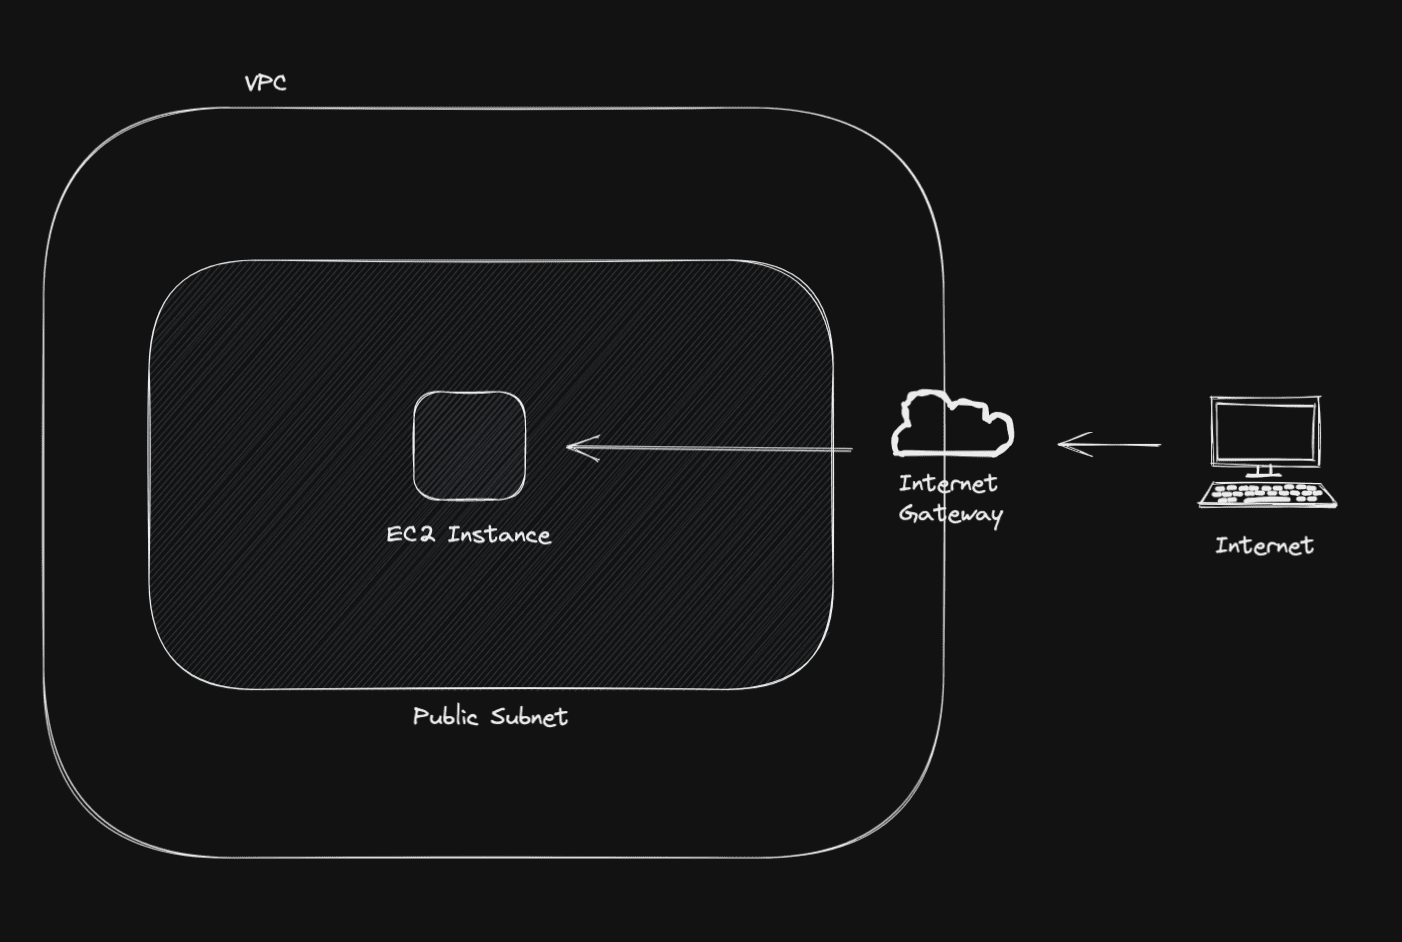
First, we need a VPC that lets us launch other AWS resources in an isolated virtual network that we can define as wanted.
resource "aws_vpc" "vpc" {
cidr_block = "10.0.0.0/16"
}
Then, to enable Plausible to have access to the internet we need to place it in a public-facing subnet. For those who don't know, if a subnet is associated with a route table that has a route to an internet gateway, it's known as a public subnet.
resource "aws_subnet" "subnet" {
vpc_id = aws_vpc.vpc.id
cidr_block = "10.0.0.0/24"
}
resource "aws_internet_gateway" "gw" {
vpc_id = aws_vpc.vpc.id
}
resource "aws_default_route_table" "rt" {
default_route_table_id = aws_vpc.vpc.default_route_table_id
}
resource "aws_route" "r" {
route_table_id = aws_default_route_table.rt.id
gateway_id = aws_internet_gateway.gw.id
destination_cidr_block = "0.0.0.0/0"
}
To help secure the web server, we need a security group with rules which allow the web server to respond to inbound HTTP requests from the internet while simultaneously allowing all outbound IPv4 traffic.
resource "aws_default_security_group" "sg" {
vpc_id = aws_vpc.vpc.id
}
resource "aws_security_group_rule" "i_http" {
type = "ingress"
from_port = 8000
to_port = 8000
protocol = "tcp"
cidr_blocks = ["0.0.0.0/0"]
description = "HTTP"
security_group_id = aws_default_security_group.sg.id
}
resource "aws_security_group_rule" "e_all" {
type = "egress"
from_port = 0
to_port = 0
protocol = "-1"
cidr_blocks = ["0.0.0.0/0"]
description = "All protocols"
security_group_id = aws_default_security_group.sg.id
}
Since we need to configure the web server with several credentials, we need SSH access to it. To make it easy for this example, allow all IPV4 access to SSH but bear in mind that you should always allow only your IP address.
resource "aws_security_group_rule" "i_ssh" {
type = "ingress"
from_port = 22
to_port = 22
protocol = "tcp"
cidr_blocks = ["0.0.0.0/0"]
description = "SSH"
security_group_id = aws_default_security_group.sg.id
}
Let's create now the EC2 instance where the web server will be launched into.
resource "aws_instance" "instance" {
ami = "ami-0b3e57ee3b63dd76b"
instance_type = "t2.micro"
subnet_id = aws_subnet.subnet.id
associate_public_ip_address = true
key_name = "plausible"
user_data = file("script.sh")
root_block_device {
volume_size = 8
volume_type = "gp2"
encrypted = true
delete_on_termination = false
}
}
The SSH key has been created with aws ec2 create-key-pair --key-name plausible --query "KeyMaterial" --output text > plausible.pem.
I created a specific script to automatically update all packages and to install docker and docker-compose in our EC2 instance to make it quicker to launch our Plausible server.
#!/bin/bash
yum update -y
amazon-linux-extras install -y docker
service docker start
usermod -a -G docker ec2-user
chkconfig docker on
curl -L https://github.com/docker/compose/releases/latest/download/docker-compose-$(uname -s)-$(uname -m) -o /usr/local/bin/docker-compose
chmod +x /usr/local/bin/docker-compose
reboot
Now, we can follow their guide.
We need to download their repository first:
$ curl -L https://github.com/plausible/hosting/archive/master.tar.gz | tar xz
$ cd hosting-master
Then, we need to add the required environment variables to plausible-conf.env:
ADMIN_USER_EMAIL=XXX@gmail.com
ADMIN_USER_NAME=XXX
ADMIN_USER_PWD=XXX
BASE_URL=http://1.2.3.4:8000 = the public IP of your EC2 instance
SECRET_KEY_BASE=XXX = a random base64 secret keySince I want to use my Gmail account, I need to create a Google App Password and then add below environment variables to the configuration file:
SMTP_HOST_ADDR=smtp.gmail.com
SMTP_HOST_PORT=465
SMTP_USER_NAME=XXX@gmail.com
SMTP_USER_PWD=XXX = your Google App Password
SMTP_HOST_SSL_ENABLED=trueFinally, we can start our Plausible server with docker-compose up -d.
We should now be able to hit http://1.2.3.4:8000 in our favorite browser and see the login page of our Plausible server. At the end of the registration process, we should have the script that we would need to add to our website to start gathering page views.
In a Next.js website, you can add the script in the _document.js file:
class MyDocument extends Document {
static async getInitialProps(ctx) {
const initialProps = await Document.getInitialProps(ctx)
return { ...initialProps }
}
render() {
return (
<Html>
<Head>
<script async defer data-domain="example.com" src="http://1.2.3.4:8000/js/plausible.js" />
</Head>
<body>
<Main />
<NextScript />
</body>
</Html>
)
}
}
Awesome! We can now check back our Plausible server at http://1.2.3.4:8000 to see whether we're getting any visits to our website.
Wrapping upLink to this heading
We've installed, configured, and deployed our Plausible server in AWS with Terraform. Don't hesitate to follow their documentation to further configure your Plausible server.
Thanks so much for reading! If you liked this post or it helped you in any way please consider sharing it. I will probably make a second blog post to upgrade our Plausible server to enable SSL requests.